Aloha Art Addicts!
Ready to host your own paint and sip party? Perfect for a fun Friday night, a bridal shower, a birthday party, or just keeping the kids busy, it’s creativity, socializing, and fun combined. If you’ve never picked up a paint brush and just want to have a painting party at your house, or if you are an art teacher but need some ideas on how to exactly teach a class, this is an instructional video for everyone.
I teach often with students of varied skill levels and though there are an infinite number of ways to teach a beginner, this is my method that has worked beautifully for me and my students. I’ve also made for you a series of follow along youtube videos that will be enormously helpful. Although, everything is written here as well.
So just like getting ready for the first day of school, here is your supply list. 
VIDEO 1: Supplies (youtube link)
Let’s go over the things each of your participants or students will need.
- CANVAS
Your options are, Acrylic Paint capable Paper, canvas board, stretched canvas, cardboard, you name it! You’ll find many options at your local craft store.
Even something upcycled is great. Just put a layer of gesso or white acrylic on it as a base and once it’s dry you can get started. This is also a great way to upcycle those old paintings you no longer enjoy or never finished. When their value as a canvas is more to you than the art upon it, reuse it. 😀
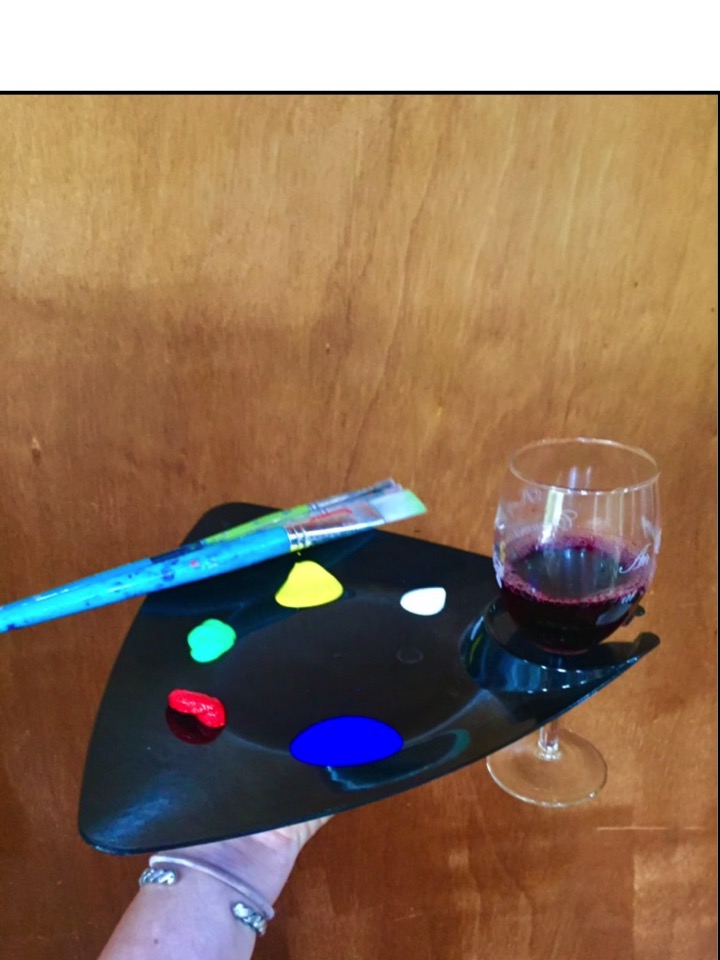
- PAPER PLATE OR PALETTE
Nothing fancy and something you don’t feel bad about throwing away. These end up looking like real works of abstract art when you’re through. A piece of glass, a ceramic plate, or plexi glass is also useful and can be used over and over again.
- ACRYLIC PAINTS
There are sets you can purchase but I’m going to give you just the essentials here. My students know that color theory is an important element to out learning to paint and so we use the primary colors and variations of red, yellow, and blue to make all of our colors. White is essential and at times even black. I know! Quelle Horror. (Side note: a sufficient and far more interesting black can be made with Ultramarine Blue (a ‘red’ blue) and Alizarin Crimson (a ‘blue’ red). But we are just starting here so you are allowed any color which you find helpful and pleasing to your personal eye.
Such colors you may wish to purchase rather than make are:
Yellow Ochre (a neutralized yellow)
Burnt Sienna (a red/brown)
Turquoise (we deal a lot with that color here in Hawaii)
Black (we already covered this area)
Cadmium Orange
Purple (if you’re looking for a special hue that your existing blue and red just can’t accomplish)
- BRUSHES / TOOLS
Now if you’re just a beginner, please don’t feel you need to go out and buy the expensive fine art brushes. Full disclosure, fine artists use all KINDs of brushes. Even spoons and sticks when the desired effect is accomplished.
Here are the three brushes that most of my students will use during a class from start to finish. A small, a medium, and a large. The larger the area you are trying to cover, the larger the brush you use and vice versa.
A pencil will also be used for our beginning sketch so have that handy and I’ll teach you when you’ll need it.
- WATER CONTAINER
A large yogurt container or medium mason jar is fine. Something you can use over and over again is nice.
- PAPER TOWELS / RAG / APRON
Some people are more messy than others. 😀 We all know into which category we fall so I leave it up to my students. Three paper towels on the table near the water is sufficient and you can always grab more if you need.
- REFERENCE MATERIAL
Now if this is your first paint and sip or if you’re hosting to brand new ‘never held a brush before’ students, this is very important. Our greatest desire is that everyone go home happy and with a painting they enjoy. I recommend a piece that is not too busy, doesn’t have more than 1 figure, and not too many main subjects, for example, flowers, trees, buildings, cars etc. Go very simple for your first time. Chose a vase of flowers with 3 blooms, not 20. Chose a sunset with 1 coconut tree, not a grove. Chose a building structure with a plain background instead of an entire street corner. Etc. and build your skills from there.
I have a download available of a very simple type of painting with an abstracted figure, no details, and one can change the background to agree with their own personal likes. (Paint and Sip Beginner DOWNLOAD) This is a printable version and a painting of my own design so feel free to use it when hosting your own paint and sip class.
Now if you’ve chosen your own reference material, you’ll need to place the grid upon it with a pen or sharpie. If you’ve downloaded reference material off of my site, I’ve provided the grid already for you.
For most of my students a grid of 6×4 (landscape) or 4×6 (portrait layout) is sufficient.
So that’s everything we need to discuss before we get started.
Follow up with the second ‘Ready Start’ Video and I’ll see you there!
VIDEO 2: READY, START!
For this tutorial, and because you have my help, we will be painting Van Gogh’s sunflowers. So you are NOT on your own. Now this is absolutely a vase of more than 3 flowers, but you have me to help you! So if you’re choosing your own image, go simple. If you’re following along with me, let’s stretch you a bit. We can always negate flowers who may not be so important to the larger story. You are the artist and it’s completely up to you.
No matter what reference material you’re using, you will need to create the same grid on your canvas as is currently on your reference material. Once that is on there, you’re ready to draw.
OKAY, SIP!!
Reminder, the sipping part is optional. In my experience it HAS helped my students alleviate their self -judgment a little. I’m in favor of anything that does that!
#artaddict on instagram or FB
I love to see what you all are accomplishing!
Your friend in art,
KK